Showing posts with label homeschool activities. Show all posts

Tuesday, October 21, 2014

November is Native American Heritage Month

In 1990, President Bush named November Native American Heritage Month. It has continued yearly as an opportunity to celebrate the culture and contributions of the first Americans. This year, I am homeschooling my first-grader and we started our history/social studies with the Age of Exploration. We moved on to learn about the Native Americans who inhabited the country prior to European discovery. So, while we could have waited until November to do our studies, our timeline allowed us to learn about this amazing group of people a little early.

My great grandmother was full Native American, but my grandfather could never remember which tribe we are related to. Regardless, it's so interesting to learn about the differences from tribe to tribe. I have several books here at home that we use as reading material, but I found a great workbook on Education.com to help us add another element to our learning. The Native American Culture for Kids workbook is 35 pages and features a number of tribes including Comanche, Hopi, Lakota, and Mohawk, and features several explanations of tribal symbols and craft activities. So far we've made a feather headdress and a shield, and they also have a dreamcatcher. You can opt to print out a full set of 17 tribes without the additional crafts if you prefer. Each page includes a brief introduction to the tribe, a reading comprehension activity and another activity such as a word search or decoding game. The workbook is listed for 3rd grade, but I use this with my advanced first-grader and we haven't had any trouble.

Here is our headdress activity:


We also printed out a list of Native American symbols and we used those to decorate our paper plate tipis (teepee, tepee). We got the tipi idea from a pinterest page, but it included straws and rolling the paper plate, and the directions were not processing for me for some reason. So we cut the bottom off of our paper plates, rolled them into a cone and stapled them when we got them to the perfect spot. we gently folded open the bottom corners to look like the doorway flaps of the tipis. Oh, but before we did the rolling of the plates, I had the kids use the symbols to decorate them. I don't know what it is about symbols, but my son loves them, and this activity (and the headdress and shield) really worked for him. He got into it and put in the time and effort, and I think he has memorized at least 25 symbols. It's amazing. Here's how we made the tipi...

Tipi Steps:
Cut off small bottom portion of paper plate.

Decorate plate with native american symbols.

Decorate on both side if you wish.

Roll paper plate into a cone and staple.

 
Have fun celebrating Native American Heritage month. There are so many educational opportunities that can be incorporated into your curriculum, from growing crops to grinding corn, to creating replicas of common Native American items. For more information on Native American Heritage Month visit http://nativeamericanheritagemonth.gov/about/.


Tuesday, October 14, 2014

Independent Exploration Activities

I try to do a lot of science experiments and inquiry-based activities with my kids, but it's nice when I can find something for them to do on their own, freeing me up to take care of chores or dinner, while they continue to learn and engage. I've had my eye on a few Lakeshore products, but help off on purchasing them until last week. I needed a few different styles of magnets, a magnifying glass, and a specimen viewer for some of the science experiments we want to do so I headed to Lakeshore to see if they had what I needed.

I browsed the science section and discovered that I could get one hand lens for $10, a box of 10 or 12 magnets (all the same style) for $15, and I didn't even bother to look for a specimen viewer. So I turned to those products I'd been debating and realized they were the perfect fit. The Can Do! Science Kits are $19.99 each, and I had a buy one get one 50% off coupon, so it was looking like a good deal. Then I read the contents. The magnet kit has a horseshoe magnet, a set of ball magnets, a bar magnet, ring magnets, and more. The magnification kit has a hand lens, a specimen viewer, and 5 specimens. Both sets include activity cards and suggestions for further exploration. Combined, these two sets had exactly what I was looking for and so much more for a sweet $30 plus change.


My science buffs wanted to open them in the car but I made them wait. When we got home though, we tore into those cans and they were occupied for at least an hour. I loved that my son, who's 6, demonstrated how the magnets worked to my 3-year-old daughter, and then showed her how to examine the specimens in the magnification set. Then they procedded to wander the house looking for things that were magnetic, and things they could magnify. It was so much fun watching them put their scientist hats on without me guiding them.

If you're looking to add something to your science repertoire, I highly recommend the Can Do! Science Kits. These are not affiliate links, just me sharing my opinion. Have fun!

Friday, September 26, 2014

Age of Exploration Timeline

We've almost made it through our first month of homeschool and we have been having a blast. Last week we went on a field trip to the Aquarium of the Pacific in Long Beach for one of the special Homeschool Day events. We had a great time, learned some new things, and got to spend some time in the classrooms participating in educational activities. For more on our visit, see my blog post on the dandelion moms website here.

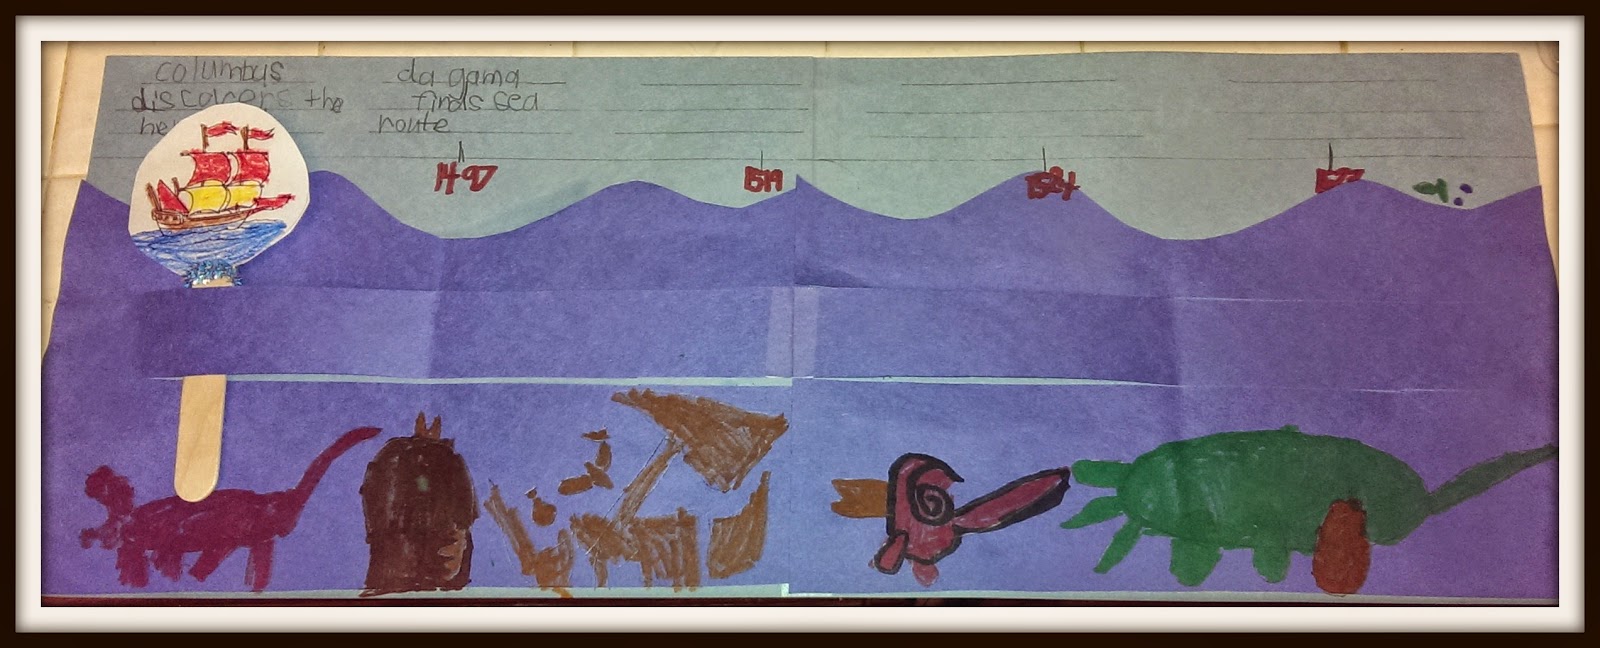
In addition to science, we've been learning about the great explorers like Magellan, Columbus, Drake, and da Gama. To reinforce our reading I helped my son put together this fun timeline highlighting some of the most important explorations.

 
We glued the dark blue construction paper onto the light blue construction paper after we cut the waves and the sailing strip. My son added sea monsters, as the legend of giant sea creatures was one of the elements that kept people from venturing out too far into the ocean all those years ago. He also added a sunken ship and a treasure chest.
 
We added five major explorations to our timeline: Columbus in 1492, da Gama in 1497, Magellan in 1519, Verrazano (or Varrazzano) in 1524, and Drake in 1577.
 
I printed up a small picture of a caravel, the popular sailing ship of the time, designed by Prince Henry the Navigator. My son colored it, glued it to a jumbo popsicle stick, and we wrapped a piece of pipecleaner just below the ship so that it doesn't fall through when we hang it on the wall. 
 
This was a fun activity and I think we will use the idea again with a different theme. Do you have any fun timeline activities? Please share your ideas with us below.
 
We used a few other websites for information during our studies. Mr. Nussbaum has lots of information with printable worksheets and online interactive games and activities to reinforce learning. There are some great ideas at the blog The {Art} of Learning, and we liked the ship activity. I couldn't find a template for it though, so I drew my own. You can get a very unprofessional copy of my template here - it might print out with some of the blemishes but you can use it to trace your own.
 
You might also look for these books at the library: The History News: Explorers by Michael Johnstone (Candlewick Press) and Exploring the World by Fiona Macdonald (Peter Bedrick Books). We also used World History by John Farndon and Victoria Parker (Sandy Creek) and the Children's Encyclopedia of American History by David C. King (DK Publishing).
 
I found a lot of other fun activities and information that I listed on my Pinterest page for future reference. Follow me at http://www.pinterest.com/heididealwrites/ to get in on the fun!


Thursday, August 21, 2014

Raddish: Culinary Skills and Healthy Eating for Kids

A few months ago at the CHEA convention in Anaheim I discovered the Raddish booth. I fell in love with the adorably illustrated recipe cards and the concept that cooking and curriculum can connect so seamlessly.


Raddish is sold in a subscription format and every month you get a box that contains three recipe cards, table talk cards to encourage coversation over meals, activity ideas to complement the recipes, a skill card to teach new culinary skills and so much more. The recipe cards offer additional educational information and suggestions for putting what you learn into action. The Raddish website even offers supplemental recipes, activities, and lesson plans to accompany your Raddish subscription.

I really wanted to try a box.

You can imagine how excited I was when I was given the opportunity. I am a contributor for dandelion moms and was so kindly given a box to try with my family. You can see my full post here.

Maybe your kids love cooking, maybe you want to improve your culinary skills and create an opportunity for family time, or maybe you are looking for an elective to add to your homeschool curriculum. No matter your situation, I highly recommend Raddish. My kiddos and I give it three thumbs up!

Friday, June 6, 2014

Sick Day Science - Volcanoes!

My son wasn't feeling well so he stayed home from school. An outing was out of the question but we made the most of our day and studied volcanoes. He was given a Smithsonian Giant Volcano Kit for his birthday a few days ago, so we decided to build it and add other informative activities to round out the learning experience.

I kicked things off by letting the kids watch the Magic School Bus Blows Its Top on Netflix. We've also read the book, but didn't have it on hand today. When the show was over, we learned some volcano vocabulary from a worksheet I printed off of education.com. I love this site for educational materials and the coloring worksheet allowed me to describe the parts of the volcano and some of the things associated with it while providing a visual reference for the kids.
 

Finally we rolled up our sleeves and built the volcano. The entire process is easy, but you will have to take two breaks - one while the plaster strips dry and one while the paint dries.Wrapping the string around the base and cone was definitely an adult job (or more coordinated older child), but most of the other steps were kid-friendly. We dipped the strips and plastered the volcano and waited patiently for it to dry.


 While we were waiting, I remembered the new book we have, Where On Earth? It has amazing maps and two of the pages talked about volcanoes - one talking about the relationship between mountains and volcanoes, and the other showing all the active and inactive volcanoes on the planet. We read about some of the major eruptions and learned about the Ring Of Fire.


Next, the kids painted the volcano. Green and brown paint and a small sponge is provided with the kit, but younger kids like mine haven't mastered the art of applying sparingly. The paint pots emptied quickly so I gave them some of our own green and brown paint and provided paint brushes and extra sponges.
 
 
When the paint was dry, we were ready to watch the eruption. My husband suggested the bathtub and that worked out nicely. The instructions give you the measurements of baking powder and vinegar, but our eruption was over pretty quickly. I think it would have put on a better show had I poured the vinegar in more slowly. We added some baking soda and vinegar to see if there was a different or better reaction but it was pretty similar to the first eruption.


Even though the eruption was small, it was a great day learning about volcanoes, how they are formed, and what happens when they erupt. Also, the volcano dried nicely so we'll be able to experiment again and see if we can create a larger eruption.You can find similar kits at NSI International. For more information about volcanoes visit http://volcano.oregonstate.edu/.