Tuesday, October 21, 2014

November is Native American Heritage Month

In 1990, President Bush named November Native American Heritage Month. It has continued yearly as an opportunity to celebrate the culture and contributions of the first Americans. This year, I am homeschooling my first-grader and we started our history/social studies with the Age of Exploration. We moved on to learn about the Native Americans who inhabited the country prior to European discovery. So, while we could have waited until November to do our studies, our timeline allowed us to learn about this amazing group of people a little early.

My great grandmother was full Native American, but my grandfather could never remember which tribe we are related to. Regardless, it's so interesting to learn about the differences from tribe to tribe. I have several books here at home that we use as reading material, but I found a great workbook on Education.com to help us add another element to our learning. The Native American Culture for Kids workbook is 35 pages and features a number of tribes including Comanche, Hopi, Lakota, and Mohawk, and features several explanations of tribal symbols and craft activities. So far we've made a feather headdress and a shield, and they also have a dreamcatcher. You can opt to print out a full set of 17 tribes without the additional crafts if you prefer. Each page includes a brief introduction to the tribe, a reading comprehension activity and another activity such as a word search or decoding game. The workbook is listed for 3rd grade, but I use this with my advanced first-grader and we haven't had any trouble.

Here is our headdress activity:


We also printed out a list of Native American symbols and we used those to decorate our paper plate tipis (teepee, tepee). We got the tipi idea from a pinterest page, but it included straws and rolling the paper plate, and the directions were not processing for me for some reason. So we cut the bottom off of our paper plates, rolled them into a cone and stapled them when we got them to the perfect spot. we gently folded open the bottom corners to look like the doorway flaps of the tipis. Oh, but before we did the rolling of the plates, I had the kids use the symbols to decorate them. I don't know what it is about symbols, but my son loves them, and this activity (and the headdress and shield) really worked for him. He got into it and put in the time and effort, and I think he has memorized at least 25 symbols. It's amazing. Here's how we made the tipi...

Tipi Steps:
Cut off small bottom portion of paper plate.

Decorate plate with native american symbols.

Decorate on both side if you wish.

Roll paper plate into a cone and staple.

 
Have fun celebrating Native American Heritage month. There are so many educational opportunities that can be incorporated into your curriculum, from growing crops to grinding corn, to creating replicas of common Native American items. For more information on Native American Heritage Month visit http://nativeamericanheritagemonth.gov/about/.


Tuesday, October 14, 2014

Independent Exploration Activities

I try to do a lot of science experiments and inquiry-based activities with my kids, but it's nice when I can find something for them to do on their own, freeing me up to take care of chores or dinner, while they continue to learn and engage. I've had my eye on a few Lakeshore products, but help off on purchasing them until last week. I needed a few different styles of magnets, a magnifying glass, and a specimen viewer for some of the science experiments we want to do so I headed to Lakeshore to see if they had what I needed.

I browsed the science section and discovered that I could get one hand lens for $10, a box of 10 or 12 magnets (all the same style) for $15, and I didn't even bother to look for a specimen viewer. So I turned to those products I'd been debating and realized they were the perfect fit. The Can Do! Science Kits are $19.99 each, and I had a buy one get one 50% off coupon, so it was looking like a good deal. Then I read the contents. The magnet kit has a horseshoe magnet, a set of ball magnets, a bar magnet, ring magnets, and more. The magnification kit has a hand lens, a specimen viewer, and 5 specimens. Both sets include activity cards and suggestions for further exploration. Combined, these two sets had exactly what I was looking for and so much more for a sweet $30 plus change.


My science buffs wanted to open them in the car but I made them wait. When we got home though, we tore into those cans and they were occupied for at least an hour. I loved that my son, who's 6, demonstrated how the magnets worked to my 3-year-old daughter, and then showed her how to examine the specimens in the magnification set. Then they procedded to wander the house looking for things that were magnetic, and things they could magnify. It was so much fun watching them put their scientist hats on without me guiding them.

If you're looking to add something to your science repertoire, I highly recommend the Can Do! Science Kits. These are not affiliate links, just me sharing my opinion. Have fun!

Friday, October 10, 2014

Big Bear Family Adventure

Oh the Great Outdoors! I was born in Illinois and my early years were spent running barefooted through a giant field, stepping on bees, digging holes, climbing trees, and learning to ride a bike on a gravel road. Then we relocated to California. We found a cute house in Long Beach and the front yard had the perfect climbing tree. I remember sitting most evenings on the perfect bench-branch near the top of the tree, looking out over the rooftops of my new city and staring at the neon McDonnell-Douglas sign at the Long Beach airport. It was different. But at least I had that tree. Then we moved to an apartment, and I became a city kid. Nothing to climb but the brick wall out back.

Now, as a parent and a condo resident, I long to give my children the great experiences that only come from being outside. So I seek out nature centers, hiking trails, and any other natural setting that allows them to have natural play.

Recently our condo kicked us out for fumigation and instead of holing up in the Best Western down the street, we turned it into an adventure and headed to Big Bear. Early October is off-season there and we found a great hotel called the Marina Resort. The ground floor rooms have an excellent view of the lake and it's on a private beach. Open your door and the kids can explore the beachfront at their leisure with a small private play area. And yes, they have a pool and jacuzzi that we enjoyed.

Our private beach at the Marina Resort Hotel.

Our first adventure outside of the hotel was the Woodland Trail, a 1.5 mile interpretive loop that has 16 numbered signposts. Grab the pamphlet at the beginning of the trail and you'll learn about the trees, bugs, and wildlife that inhabit the area. My kids are 3 and 6, and they made the whole trip without complaint.

Hiking the Champion Lodgepole Pine Trail.
The next day we visited the Big Bear Alpine Zoo. I love this place because most of the animals you find here are rescues. From bald eagles to timberwolves, you'll find all things relevant to the forest. Of course there are plenty of bears and one of their newest exhibits houses two snow leopards! My son loved the kit fox, my daughter loved the porcupine, but I could have watched those wolves all day.

The timberwolves-this pack was born here and the fence is
electric because they can chew through the fence.
Our final adventure was the Champion Lodgepole Pine Trail. This one is harder to get to, requiring 5-7 miles of driving on narrow and bumpy dirt roads. But if you have a vehicle that can handle the terrain, the short hike is rewarding. The 110-foot tall Champion Lodgepole pine is a sight to be seen. We walked out to the meadow to get a good look at it was pretty magnificent. The tree was almost cylindrical compared to its younger triangular neighbors. We could have traveled a short distance farther to a nearby lake, but we weren't sure of the distance or the difficulty so we headed back. In all, the Champion Lodgepole Pine Trail is only about 30 to 40 minutes round trip and you can get a pamphlet at the Big Bear Discovery Center that explains each of the 14 numbered signposts along the trail. We didn't have a pamphlet but we noticed that a few of the numbered signposts were missing from this trail, even though it is apparrently regularly traveled by scouts and other groups.
 
Can you find the Champion Lodgepole Pine?
Note: If you go hiking in remote areas, be on the lookout for wildlife, especially snakes and mountain lions. Before you go, stop into the Discovery Center to learn useful tips on how to handle the situation if you are confronted. Always use caution! Also, pack accordingly. Bring jackets as the temperature drops quickly and pack snacks and water.  
 
We were in Big Bear from Tuesday afternoon through Thursday morning, and the Big Bear Discovery Center is closed Tuesday and Wednesday, so we were bummed that we didn't get to spend much time there. But we stopped on our way out of town. One of the docents told us to check out the play area out back and we fell in love instantly. There were so many fun areas to explore from making music to building with branches and blocks to climbing a rope web.


The play area is a certified Nature Explore playground. This educational and adventurous area is amazing, especially with the backdrop of the Big Bear forest. We would have loved to stay all day, but unfortuantely we had to cut our visit a little short. There are other certified Nature Explore Playgrounds across the country. Visit the website and see if there is one near you.


Friday, September 26, 2014

Age of Exploration Timeline

We've almost made it through our first month of homeschool and we have been having a blast. Last week we went on a field trip to the Aquarium of the Pacific in Long Beach for one of the special Homeschool Day events. We had a great time, learned some new things, and got to spend some time in the classrooms participating in educational activities. For more on our visit, see my blog post on the dandelion moms website here.

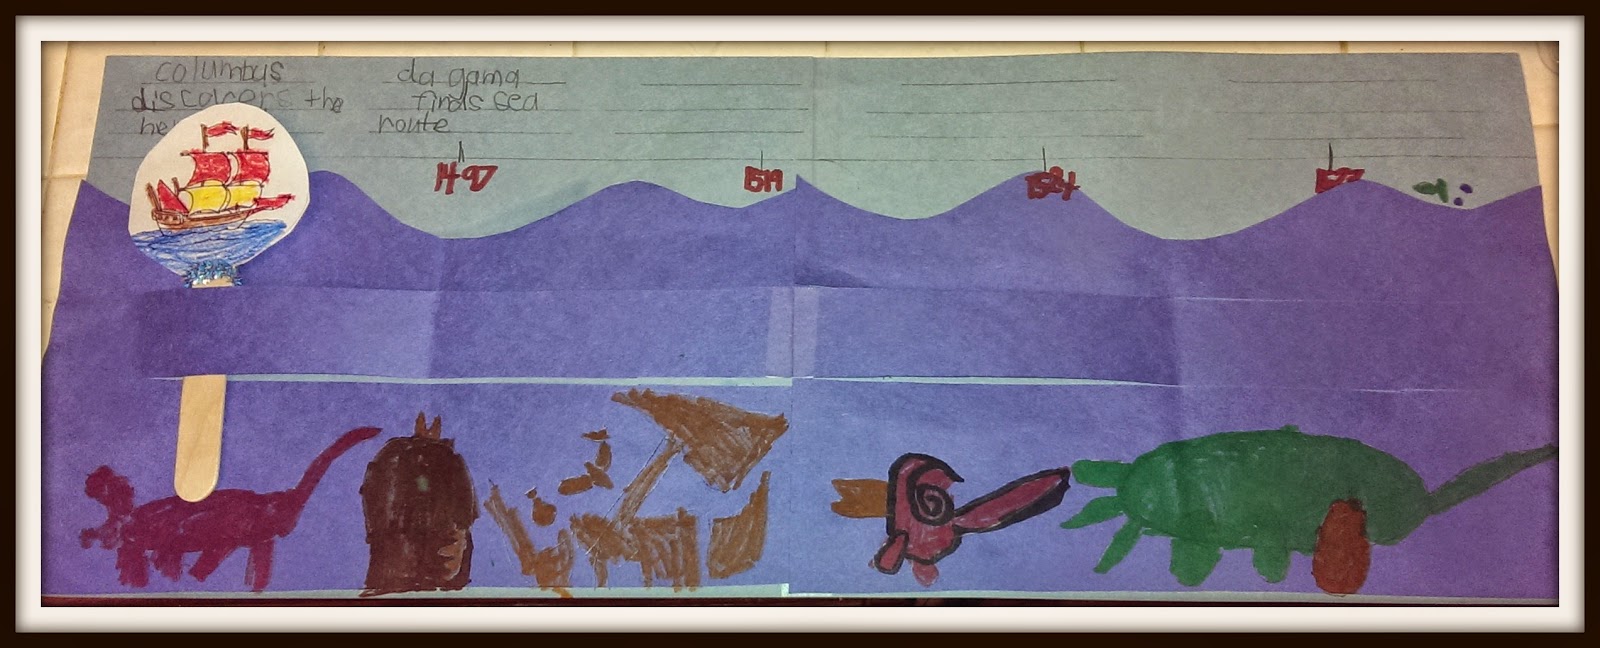
In addition to science, we've been learning about the great explorers like Magellan, Columbus, Drake, and da Gama. To reinforce our reading I helped my son put together this fun timeline highlighting some of the most important explorations.

 
We glued the dark blue construction paper onto the light blue construction paper after we cut the waves and the sailing strip. My son added sea monsters, as the legend of giant sea creatures was one of the elements that kept people from venturing out too far into the ocean all those years ago. He also added a sunken ship and a treasure chest.
 
We added five major explorations to our timeline: Columbus in 1492, da Gama in 1497, Magellan in 1519, Verrazano (or Varrazzano) in 1524, and Drake in 1577.
 
I printed up a small picture of a caravel, the popular sailing ship of the time, designed by Prince Henry the Navigator. My son colored it, glued it to a jumbo popsicle stick, and we wrapped a piece of pipecleaner just below the ship so that it doesn't fall through when we hang it on the wall. 
 
This was a fun activity and I think we will use the idea again with a different theme. Do you have any fun timeline activities? Please share your ideas with us below.
 
We used a few other websites for information during our studies. Mr. Nussbaum has lots of information with printable worksheets and online interactive games and activities to reinforce learning. There are some great ideas at the blog The {Art} of Learning, and we liked the ship activity. I couldn't find a template for it though, so I drew my own. You can get a very unprofessional copy of my template here - it might print out with some of the blemishes but you can use it to trace your own.
 
You might also look for these books at the library: The History News: Explorers by Michael Johnstone (Candlewick Press) and Exploring the World by Fiona Macdonald (Peter Bedrick Books). We also used World History by John Farndon and Victoria Parker (Sandy Creek) and the Children's Encyclopedia of American History by David C. King (DK Publishing).
 
I found a lot of other fun activities and information that I listed on my Pinterest page for future reference. Follow me at http://www.pinterest.com/heididealwrites/ to get in on the fun!


Thursday, September 11, 2014

Settling In To Homeschool

We've officially completed one full week of homeschool and, this being our first experience with homeschooling, I'd say we are doing pretty well. We're still figuring out how to best schedule our days and where chores and social time fits in, but we are making time for all of that and still finishing our assignments.

On our first day, I had the kids draw a self portrait. I plan on having them draw a new self portrait every month to see what changes and progress is made. Here is my son's:


We are also enjoying our curriculum materials. I purchased the Saxon Math 1 homeschool program through Houghton Mifflin. My first grader is a little ahead in math skills so the early lessons are proving to be very easy for him, but we are using it as an opportunity to review and see if there are any early skills that we need to work on. We also purchased the math manipulatives kit and we have a lot of fun using the linking cubes, rulers, balance, and other materials that it comes with. Here's a look at all that fun stuff!


We also purchased the Houghton Mifflin Science Fusion program for 1st grade and we really like it. It took some technological know-how to set up, but once I sat down and focused I was able to get our virtual classroom set up. There are still a few glitches that I need to address, but I can access all the materials so it hasn't become an issue yet. Our favorite part is the worktext that you can write in and the inquiry flipchart that offers tons of labs and experiments to go along with our reading.

I have the language arts workbooks, but I'm looking for a more instructional and informative language arts program, rather than just worksheets with short fill in the blank activities. Do you have a favorite language arts program? I'd love to hear about it!

Thursday, August 21, 2014

Raddish: Culinary Skills and Healthy Eating for Kids

A few months ago at the CHEA convention in Anaheim I discovered the Raddish booth. I fell in love with the adorably illustrated recipe cards and the concept that cooking and curriculum can connect so seamlessly.


Raddish is sold in a subscription format and every month you get a box that contains three recipe cards, table talk cards to encourage coversation over meals, activity ideas to complement the recipes, a skill card to teach new culinary skills and so much more. The recipe cards offer additional educational information and suggestions for putting what you learn into action. The Raddish website even offers supplemental recipes, activities, and lesson plans to accompany your Raddish subscription.

I really wanted to try a box.

You can imagine how excited I was when I was given the opportunity. I am a contributor for dandelion moms and was so kindly given a box to try with my family. You can see my full post here.

Maybe your kids love cooking, maybe you want to improve your culinary skills and create an opportunity for family time, or maybe you are looking for an elective to add to your homeschool curriculum. No matter your situation, I highly recommend Raddish. My kiddos and I give it three thumbs up!

Monday, July 14, 2014

Our Sand and Water Table Garden

We had a sand and water table on our patio that we were ready to toss. The kids rarely remembered to put the lids on when they were done playing and the eucalyptus trees wreaked havoc with leaves and sap. Our beautiful sand often turned to an ugly mess and so we thought it was time to retire our good friend.

But we were struck with an Aha! moment and decided to go a different route. We filled it with soil and seeds and plants and turned it into a garden for our kids to play in and observe. Originally the garden had tomato plants, strawberries, carrots and radishes, but we didn't have much luck with the carrots. They didn't have enough room to grow. The radishes did well but the kids didn't like the way they tasted. The strawberries didn't stand a chance against the baby opossum that stopped by to nibble them every night. But the tomatoes are going strong and we've since added a few flowers and another old strawberry plant (just in case the opossum gets hungry).


The kids enjoy helping water the plants and tend to the garden and my daughter loves the tomatoes. Do you have a garden planted in something out of the ordinary? Tell us what you're growing and share your pictures with us!

Wednesday, July 2, 2014

Hunting for Harlequin Bugs

The harlequin bug is an insect that migrated north into America from Mexico sometime after the Civil War. These beautiful bugs can be found in various spots around southern California and we like to hunt for them when we are out on the nature trails. They are often found in coastal scrub areas setting up shop on bladderpod plants.


Harlequin bugs on bladder pod plant
Harlequin bugs on a bladderpod plant

harlequin bugs on a bladder pod plant


Where we've found harlequin bugs:
  • Bolsa Chica Wetlands: Take the trail that starts at the interpretive center (3842 Warner Ave, Huntington Beach, CA 92647)
  • Peter and Mary Muth/ Upper Newport Bay: Lots of bladderpods on the trails near the interpretive center (2301 University Drive, Newport Beach, CA 92660)
  • Crystal Cove State Park: Explore the Environmental Study Loop, an accessible trail loop with eight field stations where you can learn about science, conservation, and even contribute to research. One stop asks you to count the number of harlequin bugs you see on the nearby plants, write down your count, and drop it in the collection box.
While the harlequin bug prefers cabbage, mustard, collards, cauliflower, radish and other cruciferous vegetable plants, bladderpods seem to satisfy them here in the coastal areas. On the trail, keep your eye out for a bristly shrub with yellow flowers and hanging pods. We've spotted bladder pod plants with zero harlequin bugs on one bush, and on a neighboring shrub up to twenty-five bugs. So look around and see if the nearby shrubs are occupied if you don't spot them right away.

Bladderpod Image thanks to California Coastal Commission
 

The harlequin bug looks harmless enough, and they are quite pretty. You can even pick one up and observe it up close, but be gentle and return it to its home when you are done. These little guys are quite powerful though. They are considered pests and are capable of destroying entire crops. By sucking the sap from plants, the bug causes the host plant to dry out, wilt and die.

Not the best for local farmers, but always fun for little insect hunters.

Saturday, June 28, 2014

Ham and Broccoli Swirls - Kid Style

I love cooking with the kids when I can find recipes with tasks that are safe and manageable for them. Sometimes recipes call for too much mixing over the stove or lots of chopping with sharp knives. And we all know how that can turn out when youngsters are involved. I prefer to keep all their digits and allow them to remain free of 3rd degree burns so I limit their activity to prep work they can do at the kitchen table.

I found an old cookbook the other day with some fun appetizer recipes that gave the kids the chance to do more than just one step so I let my son choose one to try. He chose the Ham and Broccoli Swirl. You can find the recipe here.

The recipe as-is is do-able, but the slicing step was difficult to accomplish. They had no trouble rolling out the pastry sheet and spreading the cream cheese, and adding the toppings was fun and manageable. And rolling it into the "jelly roll" was only moderately challenging. The hard part was slicing these guys. I'm an average cook and while I am pretty agile with a knife, slicing that bad boy into 32 pieces just wasn't going to happen. When you press down with the knife the whole thing smushes and the contents completely fall out of the swirl. The pictures in the book look nice, but ours just weren't destined to turn out that way. Our second biggest challenge was that little sister wouldn't stop eating the partially frozen broccoli.


Instead, we sliced thicker pieces (we got 9 out of it) and ate it as an accompaniment to baked potato soup in lieu of bread. Dip them in the soup and they are pretty fantastic. Also, my kids didn't like the taste of the cream cheese so much so we've made a few alterations to the recipe:

Roll the pastry sheet as described then sprinkle with shredded cheddar or swiss. Add the broccoli and ham. Roll as directed. Slice into 10 pieces and place evenly spaced on baking sheet, or leave whole and bake until browned and cheese is melted, let cool, then slice into 10 pieces.


Enjoy!

Tuesday, June 24, 2014

Toothpick Sea Urchins

We were reading The Magic School Bus On The Ocean Floor and noticed a cute sea urchin in the illustrations on one of the pages. The kids in Ms. Frizzle's class all had their ocean floor projects displayed and Gregory made sea urchins out of clay and toothpicks. What a great idea!

After we finished reading, I got out the Play-Doh and a stash of toothpicks and the kids went sea urchin silly. It's amazing how much fun kids can have rolling balls of dough and sticking them with toothpicks. Before I knew it, the was an urchin army on my kitchen table.


Shortly after they finished making their sea urchins they ended up watching the Octonauts and the Urchin Invasion, so they got a fun mini-lesson. Great combo if you're looking for some at-home afternoon fun.

Friday, June 6, 2014

Sick Day Science - Volcanoes!

My son wasn't feeling well so he stayed home from school. An outing was out of the question but we made the most of our day and studied volcanoes. He was given a Smithsonian Giant Volcano Kit for his birthday a few days ago, so we decided to build it and add other informative activities to round out the learning experience.

I kicked things off by letting the kids watch the Magic School Bus Blows Its Top on Netflix. We've also read the book, but didn't have it on hand today. When the show was over, we learned some volcano vocabulary from a worksheet I printed off of education.com. I love this site for educational materials and the coloring worksheet allowed me to describe the parts of the volcano and some of the things associated with it while providing a visual reference for the kids.
 

Finally we rolled up our sleeves and built the volcano. The entire process is easy, but you will have to take two breaks - one while the plaster strips dry and one while the paint dries.Wrapping the string around the base and cone was definitely an adult job (or more coordinated older child), but most of the other steps were kid-friendly. We dipped the strips and plastered the volcano and waited patiently for it to dry.


 While we were waiting, I remembered the new book we have, Where On Earth? It has amazing maps and two of the pages talked about volcanoes - one talking about the relationship between mountains and volcanoes, and the other showing all the active and inactive volcanoes on the planet. We read about some of the major eruptions and learned about the Ring Of Fire.


Next, the kids painted the volcano. Green and brown paint and a small sponge is provided with the kit, but younger kids like mine haven't mastered the art of applying sparingly. The paint pots emptied quickly so I gave them some of our own green and brown paint and provided paint brushes and extra sponges.
 
 
When the paint was dry, we were ready to watch the eruption. My husband suggested the bathtub and that worked out nicely. The instructions give you the measurements of baking powder and vinegar, but our eruption was over pretty quickly. I think it would have put on a better show had I poured the vinegar in more slowly. We added some baking soda and vinegar to see if there was a different or better reaction but it was pretty similar to the first eruption.


Even though the eruption was small, it was a great day learning about volcanoes, how they are formed, and what happens when they erupt. Also, the volcano dried nicely so we'll be able to experiment again and see if we can create a larger eruption.You can find similar kits at NSI International. For more information about volcanoes visit http://volcano.oregonstate.edu/.

Tuesday, May 20, 2014

Solar System Fact Sheet and Activities

My son loves learning about everything. One of his favorite subjects is Space and our Solar System. Since we are planning on transitioning to homeschooling this fall, I've started playing with making my own fact sheets and mini-workbooks for him to use.

After reading the fact sheet, he can move on to answering the questions in the activity book, filling out the creative writing prompt, and doing the mini-activity. If your little one loves space, feel free to download the fact sheet and workbook below.

Happy learning!


http://copyandcontentpro.files.wordpress.com/2012/08/solar-system-fact-sheet-pdf.pdf
Fact Sheet


http://copyandcontentpro.files.wordpress.com/2012/08/solar-system-worksheet-pdf.pdf
Workbook


Monday, May 19, 2014

A Weekend Hike at Oak Canyon Nature Center

We decided to spend our Sunday morning exploring the great outdoors (one of my favorite things to do). Oak Canyon Nature Center in Anaheim is the perfect spot for hiking with the kids. We visited quite a while ago, but with two little ones and a double jogger to push, our options were limited to the Main Road, which offers a wide packed dirt trail to follow alongside the meandering stream heading uphill, so you still get a bit of a workout and a super enjoyable experience.


This time, we were free to travel several of the other trails the area has to offer as both of our little ones are now sure-footed and eager to explore. We didn't hold back. We walked the Tranquility Trail up to the scenic outlook, caught the Main Road to Bluebird Lane, hitched back on the Bluebird Loop, connected to the Quail Trail and Roadrunner Ridge, passed through the Heritage Trail to see the Butterfly Garden, and hooked up with the Stream Trail to visit the Oldest Oak Tree. We also stopped by the Caves Formed By Erosion and the small Old Time Mining Display.


Most of the trails are shady and pleasant, as you stroll through oak woodlands and enjoy the peaceful trickle of the nearby stream. Bluebird Lane has some shade, but Roadrunner Ridge runs along the top of the canyon and gets full sun. Also, Roadrunner Ridge has steep drop-offs alongside the trail so keep your kids close and hold hands if they're little.


The nice thing about this hike was my son's involvement. Generally, he's not much of a hiker, unless he has something to keep him interested. He loves maps, and the trail guide available at the Nature Center has an image of the trails with a legend and identifiable landmarks. He loved navigating the trails, leading us from one landmark to the next, and helping determine which way to go at the trail intersections. I need to get this boy a compass.


In the end, we were able to hike two and a half miles of trails with a 5-year old and a 2-year old. I had to carry my little girl for a bit, but she's such a trooper and loves to run, so she had plenty of opportunities for that here.

The Interpretive Center is a great place to stop in before and after your hike. There's a small library with children's books, several terrariums with Western Toads, snakes, and bearded dragons, and a few things to explore like animal pelts, horns, and a small box with a mini dinosaur skeleton to excavate. Don't miss the viewing window along the far wall - it looks out at an area that has a small stream, bird feeders, and squirrel feeders. We saw tons of squirrels and birds stopping for water and a bite to eat, and there are binoculars available for getting a closer look.


And if you're an information-nut like me, the area near the front desk has lots of reference books to look at.

If you haven't been, I definitely recommend a trip to Oak Canyon Nature Center. If you have been, you should probably go again. This place rocks.

Oh, restrooms - the brick building near the parking lot is fine, but if you go when the Interpretive Center is open there are a few there, too and they are a bit more comfortable.

For information call 714-998-8380

Friday, May 2, 2014

Hands-On at Cabrillo Marine Aquarium

Last weekend we headed to 22nd Street Landing in San Pedro for Day At the Docks. We took the kids on board some of the local fishing boats to see what it's like, and since their Dad spends a lot of time on fishing boats, they were excited to see where he spends his time when he's away from home. Their favorite parts: the free hot dogs and candy, and the bunks on the overnight charter boats.

Once we finished up with the boat tours, we had lunch and made our way to the Cabrillo Marine Aquarium. This was our second visit, but it's been quite a while since our first. This is hands down one of my favorite aquariums, in fact, I enjoy my visits here even more than The Aquarium of the Pacific in Long Beach. Here's why: The walls are covered with facts and information about the ocean and the animals that inhabit the waters just outside our door. There's a giant poster with a drawing of a kelp plant, and at the root of the kelp plant, they've glued the approximate amount of all the tiny organisms and animals that live down in the sand, under water, thriving in the roots of kelp. And case after case offers something new to explore - seashells, fossils, sand dollars. One of my favorite displays is the preserved footballfish. This guy is odd and eerie, but amazing. He is the largest of his kind and only the 10th to be caught, according to records.

Footballfish Photo Courtesy of Cabrillo Marine Aquarium

The touch tank here is full of sea anemones and urchins and abalone and starfish and lots of other fun fish. But keep your hands out of the water on the backside - there are sharks in there! Once we were done at the touch tank, we met a group in the courtyard to hatch grunion. They distributed baby food jars of sand, seawater, and grunion eggs. We shook the jars as directed and sure enough right before our eyes, the tiny clear eggs popped into tadpole-like fish.


Throughout the aquarium you'll visit exhibits that focus on different areas of the ocean from kelp forests to sandy beaches to the open ocean. In the aquatic nursery you'll meet a baby octopus and tiny seahorses. The Exploration Center is a hands-on interactive area for kids to play with puzzles, costumes, coloring activities and more. Keep an eye out for the scavenger hunt list on the wall. And don't skip the library. They have a huge selection of books about all things aquatic and the children's section has coloring pages and tons of fun books to read.


Aquatic Nursery


Admission to the Cabrillo Marine Aquarium is free but they do ask for donations. When you visit, please kindly contribute to keep this amazing aquarium open.

Make a day of your visit and head out to the surrounding area for a nature walk. Pick up the Walk Cabrillo guide located throughout the aquarium and follow the map to explore the Coastal Native Plant Garden, cliffs full of fossils, the salt marsh at Salinas de San Pedro, and tidepools at Point Fermin State Marine Park. Don't forget the sunblock!

For information on educational youth programs visit the Cabrillo Marine Aquarium website at http://www.cabrillomarineaquarium.org/education.asp.

Friday, April 25, 2014

Experimental Home School Day

My son loves school. And his sister, who's almost 3, already wants to go to school like her big brother. But even though they are so fond of it, I'm leaning more and more towards the decision to home school.

We've been talking about it together as a family and we recently had the opportunity to take a day to experiment with the idea.We decided to go on a field trip. Our destination was Laguna Hills Community Center to check out the fossils and learn about the animals that have inhabited the area over the years and the changes that have occurred over time. The kids loved this spot and the Community Center provides informational material and an activity packet for the kids to add to the educational experience of the visit. To learn more about the Community Center and our visit, check out my previous post, Got Fossils?


We realized that we were close to Laguna Niguel Regional Park, so when we were done with our visit at the Community Center we headed there to play and explore. Our first stop was the playground near the main entrance, but the highlight here was exploring the stream that runs through the park. We sent leaves and sticks downstream and watched as the current pushed them along, then we wandered both upstream and down exploring the habitat and encountered lots of animals that live there. Tadpoles, fish, turtles, crayfish, geese, many other birds, and butterflies were some of the animal friends we met along the way.


After a snack and a few more minutes of playground time we headed to the lake. We walked along the trail that surrounds the lake and watched the ducks and squirrels. On our way back we found a small amphitheatre and we all took turns putting on a performance. I danced, the kids sang, and my husband did animal impressions.

Can you see the crayfish?

 When we finally made it home, we were to tired to do any writing activities, but over the course of our field trip we fit in physical education, science, history, and visual and performing arts. Not bad for our first try.

I'd love to know what kind of field trips other homeschooling families are going on. Please leave a comment with your favorite location for field trips so we can see the great locations you're all exploring.

Laguna Niguel Regional Park is located at 28241 La Paz Road, Laguna Niguel, CA 92677